

I’ve got nothing but great reviews on these treats! And I really can’t say enough good things myself. I mean who doesn’t love peanut butter and chocolate? And now we are adding crispy puffed brown rice and flaky sea salt! The peanut filling is smooth and silky with a crispy crunch and the Lindt chocolate melts in your mouth! But hey don’t take my word for it, you’re just going to have to try them yourself and let me know!
These homemade crispy peanut butter cups make cute edible gifts. Make your own sleeve or your own package of 3 (you see what I’m doing here? 😉 ) to give to friends and family over the holidays or just because! They also freeze well so you can always tuck a few away to have on a rainy day.

Ingredients
These homemade crispy peanut butter cups are made with only 6 simple ingredients. You may even have everything in your pantry! I highly recommend sourcing out crispy puffed brown rice, because they make the filling crisp and crunchy! I got mine at my local bulk food store.
- Smooth peanut butter
- Icing sugar
- Unsalted butter
- Crispy puffed brown rice (or Rice Krispies)
- Milk chocolate (good quality, I use Lindt)
- Flaky Sea Salt (Malden)

Tips For The Best Results
- Use good quality chocolate! There are only a few ingredients in this recipe so each ingredient really shines. Using cheaper chocolate will really bring down the quality. Lindt chocolate is my favourite.
- Use a piping bag to distribute the chocolate. This way you can work faster as your chocolate will start to harden on you. You will also get a more accurate and even amount of chocolate in the cups.
- Don’t rush the process! The chocolate needs time to set in the freezer before each step, rushing this step could turn out wonky shaped cups.
- Use peanut butter that you love and already enjoy.
- Don’t skip on the crispy puffed brown rice; they really do elevate these peanut butter cups!
- Don’t go crazy with the sea salt, a small pinch goes a long way!
How To Make Homemade Crispy Peanut Butter Cups
Step One: In a small bowl add peanut butter, icing sugar, and butter together and mix until smooth. Add crispy puffed brown rice (or Rice Krispies) and stir together. Set aside.
Step Two: Melt 9 oz of the chocolate over a double boiler or in the microwave. Transfer melted chocolate to a piping bag and pipe chocolate evenly into prepared cups (working quickly as the chocolate will start to thicken). Then place the cookie sheet into the freezer and freeze chocolate cups for 5-10 minutes, or until set.
Step Three: Once set spoon a teaspoon of the peanut butter mixture into the centre of each chocolate cup and smooth out making sure not to touch the edges.
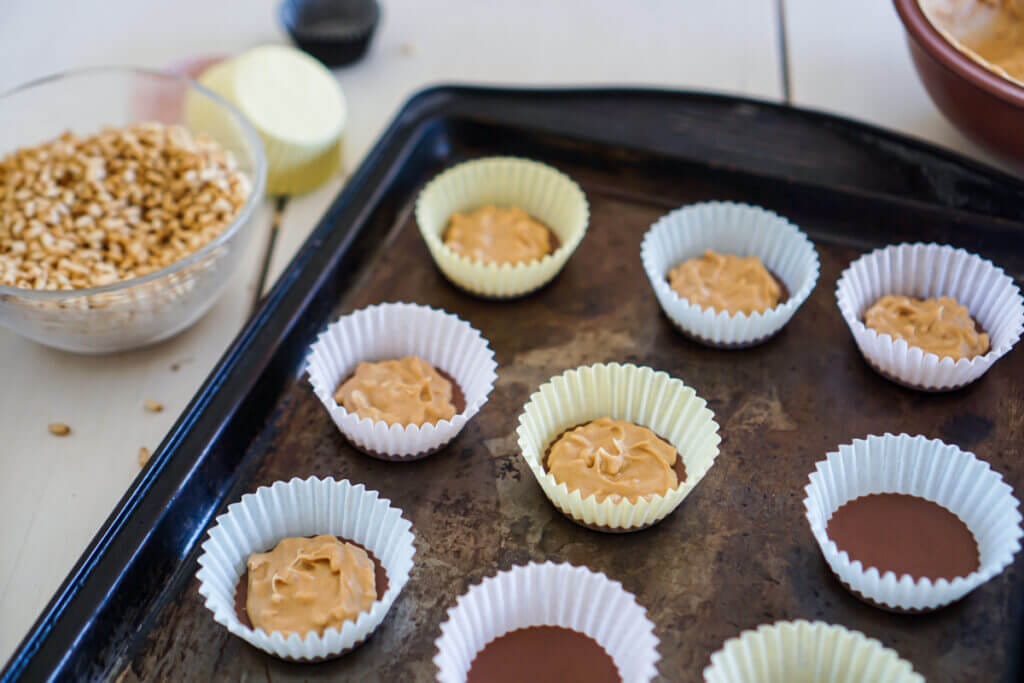
Step Four: Melt the other half of the chocolate, transfer to a piping bag and pipe the chocolate over the tops of the peanut butter mixture. Place the cookie sheet into the freezer and freeze the chocolate cups for 5-10 minutes, or until set. Then, sprinkle flaky sea salt on the tops.
Substitutions for Crispy Peanut Butter Cups
- Use dark chocolate instead of milk chocolate
- Change out the crispy puffed brown rice for Rice Krispies
- Omit the crispy puffed brown rice to have a smooth filling
- Use crunchy peanut butter instead of smooth

Homemade Crispy Peanut Butter Cups

Reeses Pieces has got nothing on these homemade crispy peanut butter cups! They are absolutely decadent, rich, creamy and crispy! With only 6 simple ingredients these beauties whip together in no time.
- Prep Time: 30 mins
- Total Time: 30 minutes
- Yield: 12 1x
- Category: Candy
- Method: Candy Making
- Cuisine: American
Ingredients
- 1/4 cup smooth peanut butter
- 2 Tablespoons icing sugar, sifted
- 1 Tablespoon unsalted butter, at room temperature
- 2 Tablespoons plus 2 teaspoons crispy puffed brown rice (or Rice Krispies)
- 11 oz milk chocolate (good quality, I use Lindt), divided
- Flaky Sea Salt (I used Maldon)
Instructions
- On a baking sheet place 12 small sturdy muffins cups (approx. 1 1/2″ diameter). Set aside.
- In a small bowl add peanut butter, icing sugar, and butter together and mix until smooth.
- Add crispy puffed brown rice and stir together. Set aside.
- Melt 9 oz (just less than half) of the chocolate over a double boiler or in the microwave.
- Transfer melted chocolate to a piping bag and pipe chocolate evenly into prepared cups (working quickly as the chocolate will start to firm up).
- Bang the cookie sheet gently on the counter to release any air bubbles and to evenly flatten the chocolate. Then place the cookie sheet into the freezer and freeze chocolate cups for 5-10 minutes, or until set.
- Once set spoon a teaspoon of the peanut butter mixture into the centre of each chocolate cup and smooth out making sure not to touch the edges.
- Melt the other half of the chocolate, transfer to a piping bag and pipe the chocolate over the tops of the peanut butter mixture, starting at the edges and working into the middle.
- Again, bang the cookie sheet gently on the counter to release any air bubbles and to evenly flatten the tops. Place the cookie sheet into the freezer and freeze the chocolate cups for 5-10 minutes, or until set.
- Sprinkle flaky sea salt on the tops.
- Let peanut butter cups come to room temperature before enjoying.
Notes
Store peanut butter cups in a container at room temperature for up to 5 days or in the fridge for up to 2 weeks. Let peanut butter cups come to room temperature before serving. Or freeze in an airtight container for up to 2 months.
Nutrition
- Serving Size: 1
- Calories: 189
- Sugar: 15.2g
- Sodium: 36mg
- Fat: 11.4g
- Saturated Fat: 6.6g
- Unsaturated Fat: 0
- Trans Fat: 0
- Carbohydrates: 18.9g
- Fiber: 1.2g
- Protein: 3.4g
- Cholesterol: 9mg
FAQ’s
Store peanut butter cups in a container at room temperature for up to 5 days or in the fridge for up to 2 weeks. Let peanut butter cups come to room temperature before serving.
Yes, homemade peanut butter cups freeze well. Place the cups into an airtight container and freeze for up to 2 months. Let peanut butter cups defrost at room temperature before enjoying.
Yes, you can use natural peanut butter in homemade peanut butter cups. The consistency may be a little thinner than the original version so you may want to add an extra step by placing them in the freezer to firm up before adding the melted chocolate on top.
You may also like:


Leave a Rating and Comment!
I love hearing from you! Leave a comment with any questions or how your recipe turned out (your email address will not be published)!