

These sweet little rainbow meringues are just in time for spring, St. Patrick’s Day (and Easter)! They’re great for big spring celebrations as the recipe makes a lot and it’s fun to get the kids involved too! Another fun idea for the rainbow meringues is putting them in a pot of gold (in a painted gold pot with the meringues bursting out of them).
I like to serve my meringues with fresh whipping cream, either sandwiching the meringue cookies together with the cream in the middle or just in a small bowl with meringues, a dollop of cream and some fruit. The whipping cream softens the crisp, airy cookies and gives a lovely texture combination.

Ingredients
- Egg whites
- Instant dissolving sugar (fruit sugar, caster sugar, superfine sugar)
- Pure vanilla extract
- Gel food colouring or liquid food colour
- Whipping cream (optional)
- Icing sugar (optional)
What is Instant Dissolving Sugar?
Instant dissolving sugar, also known as fruit sugar, caster sugar, or superfine sugar, is a finely ground sugar that dissolves quickly and easily into recipes. It’s beneficial in recipes for its ability to dissolve rapidly when a smooth texture is desired.
Variation
These rainbow meringue cookies are not only a cute idea for St. Patrick’s Day but would also be great for Easter! You could stick to pastel colours and make egg shapes or little rabbits! Use a round piping tip to make egg shapes.

Tips on Making Meringues
If you’ve never made meringues (or sweet little rainbow meringues) before, or are not familiar with the term glossy stiff peaks – I made sure to attach some images that will help you out. Whipping up your egg whites and making your meringues are pretty simple as there are only 2 ingredients, but there are a few helpful tips to get your meringues to set and bake without flopping.
- Clean, Grease-Free Bowl. Always work with a clean metal bowl and whisk, if there is any grease residue your meringue won’t whip to stiff peaks and will collapse.
- No Egg Yolk. If you get egg yolk in your egg whites toss them out and start over. Again your meringue won’t whip to stiff peaks and will collapse.
- Slowly Add Sugar. When adding your sugar to your egg whites make sure to add the sugar very slowly, one tablespoon at a time.
- Use the Right Sugar. Always use instant dissolving sugar (fruit sugar, caster sugar, superfine sugar) and make sure there are no large lumps.
- Convection Setting. Use the convection setting on your oven if possible. And always bake your meringues at a low temperature. If you are using a convection setting turn the oven temperature down to 210˚F.
- Don’t Open the Oven Door. Never open the oven door to check on your meringues, as they will crack when the cooler air hits them.
- When the meringues are finished baking, turn the oven off and open the oven door slightly until the temperature gradually comes down to room temperature. Or leave the meringues in the oven overnight to dry out.
If you’d like some helpful tips on separating egg whites, check out my Chocolate Cherry Pavlova post.

How To Make Rainbow Meringue Cookies
Step One: In a bowl of a stand mixer, beat egg whites on medium speed until foamy. Slowly and gradually add your superfine sugar, raise the speed to high and beat until stiff peaks form and are glossy (approx. 4-5 mins.). Add vanilla extract and mix to combine.
Step Two: Fit a large piping bag with a star tip. Set out a tall glass and turn your piping bag inside out. Place the piping bag over the tall glass so you have a tall supported column. Turn the bottom edges up and place a small piece of paper towel inside the tip to catch the drippings of the food colouring (small enough to pull through the star tip).
Starting at the top of the piping bag, drop one or two drops of food colouring so it runs down the side of the bag. Continue this using multiple colours until you have a rainbow of food colouring running down the piping bag. You can also paint the side of the bag if you’re using gel food colouring.
Step Three: Now take out the paper towel and very carefully add your meringue to the bag (If you took a long time to colour your piping bag you may need to re-whip your meringue again).
Step Four: Twist the top of the piping bag closed and start piping rosettes, approx. 1 inch in diameter on your prepared baking sheets (approx. 1-2 inches apart). Bake rainbow meringue cookies in the oven for 1.5 hours. Turn off the oven and leave the meringues inside to cool and dry out.


Step Five: When the meringues are cool and you are ready to serve, whip up whipping cream, adding vanilla and icing sugar. Sandwich two cookies together with cream in the middle. Or serve cookies with a dollop of cream on the side.


Rainbow Meringues
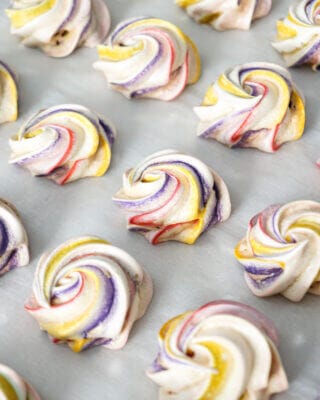
Making rainbow meringues is fun and easy, and the best part is you can make them days ahead. They are light and airy like puffs of clouds. Serve meringues with fresh whipping cream, either sandwiched together or enjoy meringues in a small bowl with a dollop of cream and some fruit. The recipe is gluten free.
- Prep Time: 20 mins
- Cook Time: 1 hour 30 mins
- Total Time: 1 hour 50 mins
- Yield: 42 Meringues 1x
- Category: Dessert
- Method: Baking
- Cuisine: Australian
- Diet: Gluten Free
Ingredients
- 4 large egg whites, at room temperature
- 1 cup instant dissolving sugar (also known as extra fine, caster sugar or fruit sugar)
- 1 teaspoon pure vanilla extract
- food colouring (gel or liquid or both)
Filling/Topping (Optional)
- 1 cup whipping cream
- 1 teaspoon vanilla
- 1 Tablespoon icing sugar
Instructions
- Preheat the oven to 230˚F. Line two baking sheets with parchment paper and set aside.
- In a large bowl of a stand mixer, beat egg whites with the whisk attachment on medium speed until foamy.
- Slowly and gradually add the instant sugar, raise the speed to high and beat until stiff peaks form and are glossy (approx. 4-5 mins.). Add vanilla extract and mix to combine. Set the meringue mixture aside.
- Meanwhile, fit a large piping bag with a star tip.
- Set out a large tall glass and turn your piping bag inside out. Place the piping bag over the tall glass so you have a tall supported column. Turn the bottom edges up and place a small piece of paper towel inside the tip to catch the drippings of the food colouring (small enough to pull through the star tip).
- Starting at the top of the piping bag, drop one or two drops of food colouring so it runs down the side of the bag. Continue this using multiple colours until you have a rainbow of food colouring running down the piping bag. You can also paint the side of the bag if you’re using gel food colouring. See the images above for a reference.
- Now take out the paper towel and very carefully add your meringue to the bag (If you took a long time to colour your piping bag you may need to re-whip your meringue again). Twist the top of the piping bag closed and start piping rosettes, approx. 1 inch in diameter on your prepared baking sheets (approx. 1-2 inches apart).
- Place your baking sheets in the oven and bake for 1.5 hours (make sure not to open the oven door and check). Turn off the oven and leave the meringues inside the oven to cool and dry out.
- When the meringues are cool and you are ready to serve them, whip up whipping cream, adding vanilla and icing sugar. Sandwich two cookies together with cream in the middle. Or serve cookies with a dollop of cream on the side.
Notes
If you are using a convection oven/setting turn the oven temperature down to 210˚F.
Once you fill the meringues with cream, they will get soft and the moisture will eventually melt the meringues down. They will not last more than a day or two.
Undressed meringues will last up to one month, stored in a dry dark place away from moisture. I like to use a tin to store meringues.
Nutrition
- Serving Size: 1 pain meringue
- Calories: 2
- Sugar: 0.1g
- Sodium: 3mg
- Fat: 0
- Saturated Fat: 0
- Unsaturated Fat: 0
- Trans Fat: 0
- Carbohydrates: 0.2g
- Fiber: 0
- Protein: 0.5g
- Cholesterol: 0
FAQ’s
Meringue cookies may remain chewy if they haven’t been baked long enough. This is the most common issue. The size of the meringue rosettes can affect the bake time. Larger meringues take longer to bake, so if you piped them larger than the recipe you’ll need to add more time. Consistency in rosette size helps ensure even baking and prevents some meringues from being chewy while others are crisp.
Meringue cookies can be made well in advance; approx. 1-2 weeks ahead of time. Undressed meringues can last up to one month when stored in a dry, dark place. However, if you fill the meringues with cream they will soften more quickly and are best consumed within a day.
Meringue cookies may burn on the bottom if the baking temperature is too high or if the meringues are placed too close to the bottom heating element in the oven. Make sure that the oven is the correct temperature and position the baking racks in the middle part of the oven. I also prefer to bake meringues on the convection setting on the oven as the hot air circulates around the meringues for an even bake.


Leave a Rating and Comment!
I love hearing from you! Leave a comment with any questions or how your recipe turned out (your email address will not be published)!
I don’t commonly comment but I have to say thank you for the recipe on this great one :D.
Aww thank you so much for the comment. So nice to hear 😊
Not sure if you’re still checking comments, but is the oven temp of 230 with or without convection? Really looking forward to making these and I don’t want to mess them up!
Hi Julie, 230˚F would be a regular oven temperature (heating from the bottom of the oven). If you are using a convention oven/setting turn the oven temperature down to 210˚F. Happy baking, hope you love the recipe. 🙂