
*This blog post contains affiliate links, so we may earn a small commission when you make a purchase through links on our site at no additional cost to you.

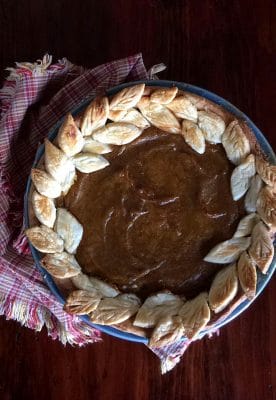
Your guests will be so impressed when you bring this pumpkin pie to the table this Thanksgiving! Believe it or not but it’s not that difficult to make! If you know how to bake any type of pie then you can easily tackle this impressive cut out leaf crust (you just need a little extra time and patience)! I really had fun getting creative, making this pie extra special for my family this Thanksgiving! It has to be one of my favourite holidays, spending the cool crisp days up at the lake, surrounded by the people I love most and enjoying delightful home cooked feasts! What could be any better?
Call me sentimental but I like traditional baking. It’s still the same pumpkin pie but with a little decorative twist! I like the way my grandma used to bake her pumpkin pies for our Thanksgiving dinners; a memory that my family and I will always cherish. She made the best pies around town and you could always smell something delicious baking in her oven. Now, I’ve just made it the prettiest pumpkin pie! 😉

Ingredients
To keep the prettiest pumpkin pie traditional the spices are simple with cinnamon, ginger and cloves mixed into the pumpkin puree. Then it’s baked in my grandma’s flaky pastry; the recipe that I use time after time.
- All-purpose flour
- Unsalted butter
- Crisco (shortening)
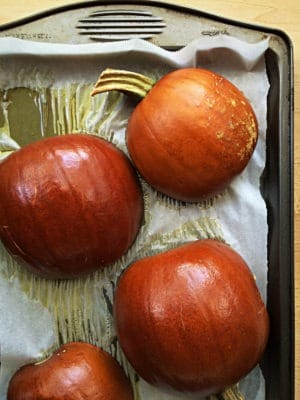
- Pumpkin puree (I used my homemade puree)
- Eggs
- Whipping cream
- Brown sugar & granulated sugar
- Ground cinnamon, ground ginger, ground cloves, ground nutmeg
- Pure vanilla extract
- Salt
Cutting Pasty Leaves For a Pretty Pumpkin Pie
To make the prettiest pumpkin pie it’s all about the edged leaves. I used the pastry scraps and hand cut them into leaves with a sharp knife. It was really simple and it added a pretty touch to the pie. I do have to mention it was a close call on having enough leaves to cover the entire rim of the pie. But you don’t have to do the entire pie if you don’t want to (it might be nice just to cover three-quarters of the pie)! Just don’t panic if you don’t make it. I ended up using every single extra piece of pastry I had. You can use leaf cookie cutters or make them by had like me.


Thankful
I’m so thankful I grew up with my grandma teaching me how cooking and baking brings families and friends together. Especially at this time of year, there is so much to be thankful for! It’s a tradition to spend Thanksgiving up north at our cottage together and every year it makes me so happy to bake for my family! My family loves it too!
I hope you have a wonderful Thanksgiving with your family and friends and that you might try getting a little adventurous and bake this pretty pumpkin pie 😉
Happy Baking!
PrintThe Prettiest Pumpkin Pie
A beautiful classic pumpkin pie with a leaf design pastry!
- Prep Time: 1 hour
- Cook Time: 1 hour
- Total Time: 2 hours
- Yield: 1 pie 1x
- Category: Dessert
- Method: Baking
- Cuisine: Canadian
Ingredients
Pastry
- 2 cups all-purpose flour
- 1/2 teaspoon salt
- 1/2 cup unsalted butter, cold and cut into cubes
- 1/2 cup Crisco (shortening), cold
- 1/4 cup ice cold water
Filling
- 2 cups pumpkin puree (I used my homemade puree)
- 2 eggs
- 1/2 cup whipping cream
- 1/3 cup packed brown sugar
- 1/3 cup granulated sugar
- 1 teaspoon cinnamon
- 1/2 teaspoon ground ginger
- 1/4 teaspoon each ground cloves and nutmeg
- 1/2 teaspoon vanilla
Instructions
- Make you pastry. In a food processor add flour and salt, blend until incorporated. Add cubes of cold butter and pulse until butter resembles crumbs. Add crisco/shortening and continue to pulse until the entire mixture resembles crumbs (but don’t overmix).
- Slowly add cold water and pulse until the dough forms into a ball, or gently shape it into a ball by hand.
- Flatten dough into a disc, wrap in plastic and refrigerate for 30 minutes.
- Preheat oven to 375˚F.
- Once dough has rested, roll out on a prepared (floured) work surface. Trying to keep a circular shape, roll dough approx. 1/8 inch to 1/4 inch thick and larger than the size of your pie dish (approx. 1 1/2 inches larger).
- Transfer the dough into your pie dish and gently press down. Cut off the edges/overhang of your dough. Take your extra dough, reshape it into a disc, wrap in plastic and place it back into the fridge (This is what you’ll use to make the leaves).
- Blind bake your pie. Using a fork, prick the bottom of the dough all over. Line the dough with parchment paper. Pour pie weights, rice or beans into the shell and bake for 20-25 minutes, just until the dough starts to set. Remove the pie from the oven, and carefully lift out the paper and weights.
- While your crust is baking make your filling. In a large bowl, whisk together pumpkin puree, eggs, cream, brown sugar, granulated sugar, cinnamon, ginger, cloves, nutmeg and vanilla. Set aside.
- Once the pie has blind baked, remove it from the oven and lower the oven temperature to 350˚F.
- Make leaf topping. Roll extra dough out and using the sharp point of a knife, cut out an assortment of leaf sizes (approx. 1-2 inches in length) or use leaf cookie cutters. Using the tip of the knife make small marks in the middle of the leaf to resemble veins.
- Assemble the pie. Pour the filling into the pie shell.
- Gently brush the front and back sides of the pastry leaves with milk. Place the leaves (and lightly press your leaves) around the edges of the pie. Place them more toward the pie plate rather than the filling as they may fall in. It’s okay if you don’t have enough leaves to cover the entire pie dish, it also looks nice if only part of the edges are decorated too.
- Bake in the oven for 35-45 minutes or until the crust is golden and the middle is set. The centre should jiggle slightly if you jiggle the pie. Note: If you find your crust/leaves are browning too fast, cover the edges with foil (I always do this at the beginning and then remove the foil near the end of baking).
- Let the pie cool on a cooling rack until ready to serve.
Notes
Garnish with whipping cream. Pie will last 3 days in the fridge.
Be careful that the top of your pie doesn’t crack or separate from the pastry. This happens for two reasons, one is when you overbake the pie (due to the eggs) and two if the pie cools too quickly. But, nothing a little whipped cream can’t take care of 😉
Nutrition
- Serving Size: 1 of 12
- Calories: 297
- Sugar: 11g
- Sodium: 167mg
- Fat: 18.8g
- Saturated Fat: 9.6g
- Unsaturated Fat: 0
- Trans Fat: 0
- Carbohydrates: 29.2g
- Fiber: 1.9g
- Protein: 3.7g
- Cholesterol: 59mg
FAQ’s
The main reason a pumpkin pie has cracks is because it’s been overbaked. This is due to the eggs as they bake and expand. Another reason for a cracked pumpkin pie is it may have cooled too quickly.
The best way to keep your pumpkin pie from getting cracks on the top is by making sure you don’t overtake the time. Time is the critical part in baking a pumpkin pie (that’s if you care to avoid cracks). A pumpkin pie is done when the centre is set. You can tell this by jiggling the pie, if the centre has a slight jiggle then it’s done. The pie will continue to set a little once out of the oven.
Yes, even though you may have cracks on the top of your pumpkin pie it will still taste and be delicious. It just means you may have baked the pie a little too long and the eggs expanded too much or the pie cooled too quickly from being so hot. But, it’s nothing a little whipped cream can’t take care of!
You may also like:


Leave a Rating and Comment!
I love hearing from you! Leave a comment with any questions or how your recipe turned out (your email address will not be published)!